In this post we will try to get in some very simple and basic tips, easy to perform and get quick improvements.
1. Detect and Repair disk errors - Check Disk
This activity is for checking the integrity of the files stored on your hard drive. Actually, as you use your hard drive, it may develop bad sectors. There are multiple reasons for getting such bad sectors developed on your hard disk, maybe say whenever a program crashes, or say due to power failure, the computer turns off abnormally and so on. Again, it may also happen, that over the time, some files that are used continuously, get corrupt leading to such bad sectors. These bad sectors slow down the overall disk performance and there may be times when data read/write on the disk may become extremely slow. Sometimes, it may even give you an error while performing the disk read/write activity.
So it's better to check for errors or bad sectors on your hard disk. Windows, has an Error Checking Utility which scans the complete hard disk for bad sectors.
To run it follow the following steps:
- Close all the files that are open (A very necessary step)
- Click Start, and click Computer
- In my computer, right-click on the drive you want to check for bad sectors, and click properties

- Select the Tools tab.

- Click the Check Now button.

- A dialog appears for the Check Disk. In here select the checkbox for scan for and attempt recovery of bad sectors and then click start.
It's a healthy habit to perform this on regular intervals, something like every week.
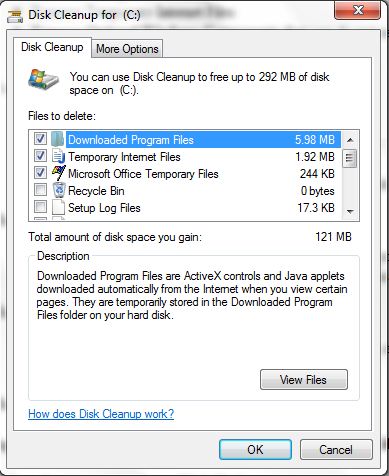
2. Free up some Disk space - Disk Cleanup
On a longer run of use of your machine, there tend to be some files that are stored in the temporary section, such as the Temporary Files, or the Temporary Internet files or as the error dump files(if any) and so on which can be gracefully removed without creating any data loss for you as well as for the installed programs. Also, there are many files that are not used for a very long time, and they can be compressed and stored on your disk to get some disk space for use.
Lets see for what all can the Disk Cleanup be used:
- Remove temporary Windows files, like the error reports and error dump files
- Clear the Recycle Bin
- Delete Downloaded files, that maybe present in the Temporary folder, (specifically, the files or programs for which we choose for direct install instead of save, get saved in temporary folder and get removed during Disk Cleanup)
- Remove Temporary Internet Files
- Remove Optional Windows Components that you do not use (say the feature of Hibernate)
- Remove unused Restore points from your system restore.
To use Disk Cleanup, follow the below steps:
- Go to My Computer.
- Right-click on the drive you want to perform disk cleanup
- select properties
- In the General tab, you will find disk cleanup button, click it

- It will now ask you some options related to which all files you wanna clean up.
- Select the required option, and the disk cleanup will start scanning your drive.

- After the scan is over, it will show you a dialog which has all the information of what can be cleaned, removed and compressed.
Again, it's good if this is performed on a regular basis. Something like once a week, or once in 15 days.
In case your disk has fragmentation, then the overall performance of your system tends to be low.
Lets understand briefly, what is Fragmentation.
You know why?? Well, this is because the computer need to search -- to and from -- for the files when they are getting opened to piece them together. Windows Operating system comes packed up with an inbuilt utility called Disk Defragmenter, which can be used to remove the fragmentation, thus boosting the overall performance your computer.
To run the Disk Defragmenter, follow the below steps:
- Click Start -> All Programs -> Accessories -> System Tools -> Disk Defragmenter.

- In the dialog box for Disk Defragmenter, select the drives and then press Defragment button.
- In case you just wanna see whether the selected drive requires defragmentation or not, click the Analyze button and then a complete report appears letting you know whether it should be deframented or not.
There is a second way of moving to Disk Defragmenter too, and its as follows:
- Go to My Computer, select a Drive, right-click Select Properties.
- In the properties window, go to Tools Tab.

- It has a Deframentation section, select Defragment now to open the disk defragmenter.

Again, it's good if this activity is performed on a regular basis, and if scheduled for doing so is nothing like it.
4. Limit Startup Processes
Lets understand first, what is the meaning of a startup process. Well, a process or an application that is started while starting our windows is called a startup process. Now many a times, what happens is while installing only the software gets into the start-up processes cadder, and always gets loaded when we start windows. Some of them include Bit-torrent, Quicktime player, Google toolbar, Google update etc. Sometimes, it may even happen that a spyware or a malware comes up from some website and takes a place into your computer's start-up processes. And this can prove very harmful to you. So, it is better to have a check over the start-up processes.
To check this follow the below steps:
- Click on Run in Start Button (in case Run is not available, press button Windows + R simultaneously)
- Write msconfig and press Ok.
- This opens the System Configuration. In this, click on the Startup Tab.
- Uncheck the boxes of the applications that you think you don't need during startup from this list (BEWARE! NOT TO UNCHECK SOMETHING SPECIFIC TO THE WINDOWS OPERATING SYSTEM, ELSE YOU WILL FACE PROBLEMS IN LOADING WINDOWS ON NEXT REBOOT).
- Please make sure you uncheck the boxes that you have installed, like BitTorrent, Quicktime, Google Update, etc.

This activity will help you reduce the load time of windows. So you got a faster loading Windows PC at the end of this activity.
5. Check for Viruses and Spyware - Protect your computer using some tool like Microsoft Security Essentials
Sadly, every Windows PC is vulnerable to viruses and spyware. And hence, you got to have a good Antivirus software installed on your computer. Viruses and Spyware cause small and big problems to various windows users. And the best way is to stay safe from them is to scan your machine periodically for them. Again, nowadays, there are many free Antivirus and AntiSpyware softwares available... It even includes the one from Microsoft -- Microsoft Security Essentials! A Cool Tool really! I use it and must say at least I am not affected since the time I have installed it.
Well Friends,
Hope this article will help you!
Happy Speeding up!